The Agreements feature allows you to formalize your coaching engagements with clients by defining clear terms, session details, and invoicing schedules. It provides a transparent and professional way to outline expectations, ensuring that both coach and coachee are aligned before the program begins.
 Create an Agreement Template
To streamline future agreement creation, you can build reusable templates with predefined terms and details.
- Go to the Agreements tab from your main menu.
- Click + New next to Template at the top-right corner of the panel.
- Fill in the Template Terms and Description to outline the scope, responsibilities, and structure of the engagement.
- Add the Total Session Count to specify how many sessions this agreement will include.
- Click Save Template to store it for future use.
Your saved template will appear in the
Template List, allowing you to quickly generate new agreements with consistent terms and formatting.
Create a Agreement from scratch
- Go to the Agreements tab from your coach dashboard.
- Click + New at the top-right corner of the panel.
- Complete the required fields:
- Title: Give your agreement a clear and descriptive name.
- Agreement Terms: Define the scope of services, responsibilities, and duration of the coaching engagement.
- Total Session Count: Specify the total number of sessions included in this agreement.
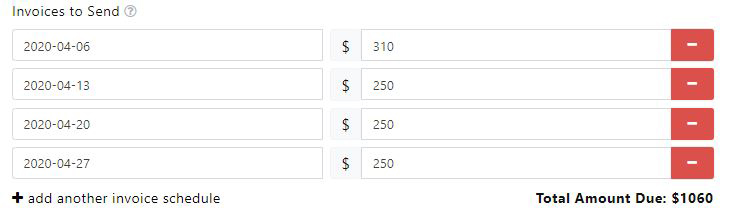
- Set the scheduled invoicing dates for the sessions.
- Assign a Coachee: Select an existing coachee from your list or create a new one directly within the form.
- Include authorized User (Optional): add an authorized user if the agreement requires approval on behalf of the coachee
- Click Save for Later to save your draft and continue editing later, or Save and Send to finalize and send the agreement for review and approval.