Manage Coaches
Updated Dec. 11, 2025 by SupportThe Coach Management section allows administrators to add and manage coaches, set their availability, assign coachees, schedule appointments, and remove coaches. It provides all the tools needed to oversee the coaching process efficiently.
 Add Coaches
Admin can add coaches individually, or use the Bulk Upload option to add multiple coaches at the same time.
 Add a coach Invidually:
- Go to the Coaches tab in your Enterprise portal.
- Click the + New button at the top-right side of the list.
- Select +Add New Coach.
- Enter the coach’s:
- First Name
- Last Name
- Email Address
- If you want to send the invitation immediately, click Send Invitation before submitting.
- Click Submit.
- If you prefer to send the invitation later, the coach will be saved as a contact in your list.
- To invite the coach later, click Options beside their name and select Send Invitation.
- The coach will receive an email with a link to activate and set up their Coaching Loft account.

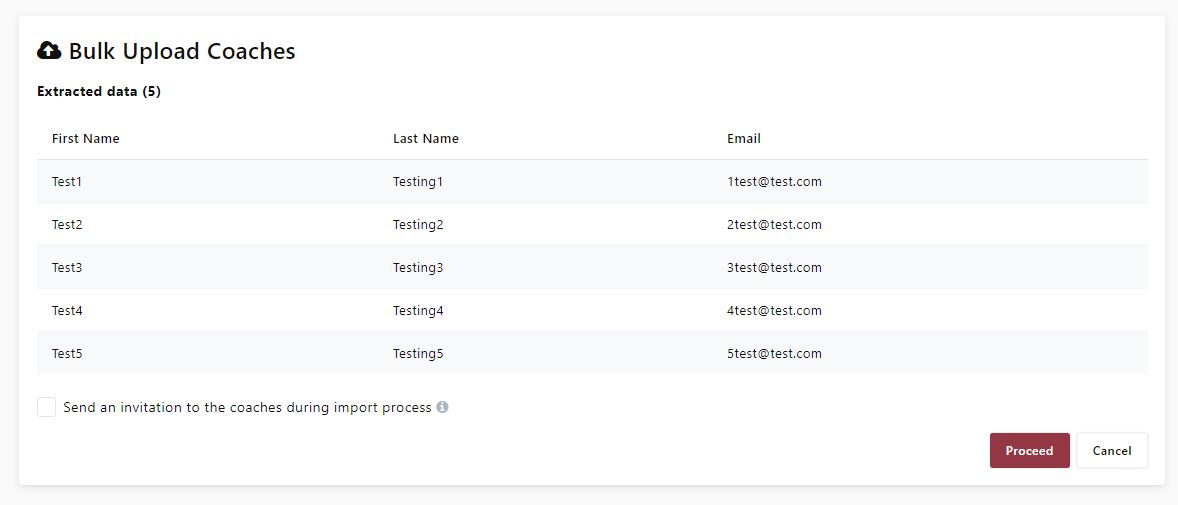
Bulk add coaches:
If you have multiple vacant seats, you can upload a list of coaches in bulk using a CSV file.
- Go to the Coaches tab in your Enterprise portal.
- Click the + New button at the top-right side of the list.
- Select Bulk Upload Coaches.
- Download the CSV file template and fill in the details of the coaches you want to add.
- (Optional) Tick Send an invitation to the coaches during import process if you want invitations to be sent automatically.
- Upload the completed CSV file.
- Review the extracted data, then click Proceed to finish the upload.
Once completed, all uploaded coaches will appear in your Coach List. Those invited will receive an activation email to set up their accounts.
 Important Note:
- Coach Seats
- Adding new coaches will consume available coach seats in your enterprise account. Please ensure you have a vacant seat before adding a coach.
- Seat allocation can be managed in settings, under Billing → Manage Seats. If you need more seats, purchase addtional ones before adding new coaches.
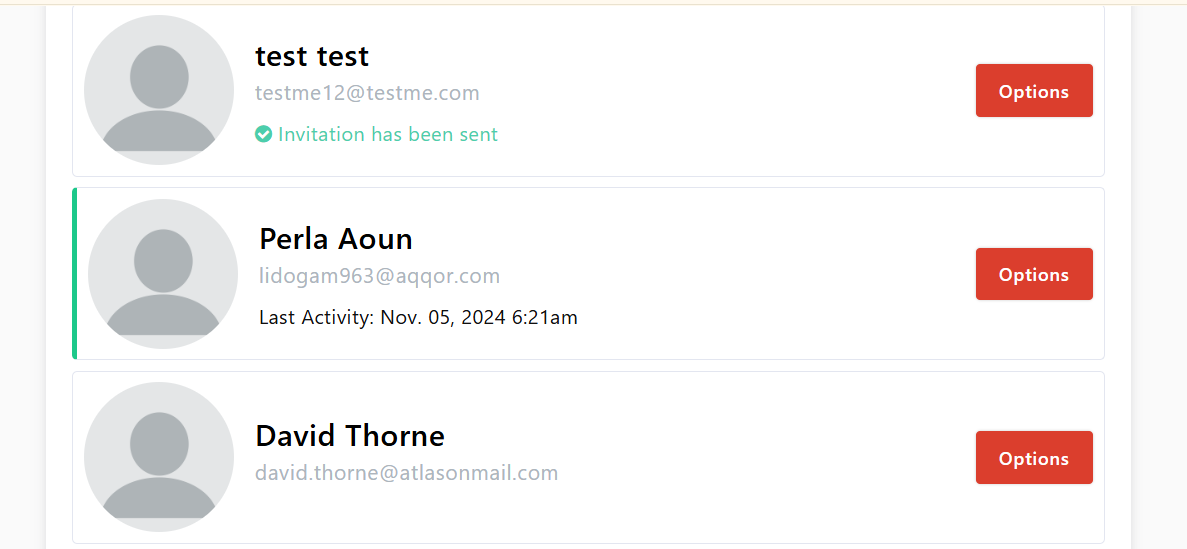
- Coach Status
- Active Coaches: A green line appears next to the coach’s name in the Coaches list.
- Invited Coaches: A label under the coach’s name will display “Invitation has been sent.”
- To re-send the invitation, click Options next to the coach’s name, then select Resend Invitation.
- Not Invited Coaches: If an invitation has not yet been sent, click Options, then select Send Invitation.
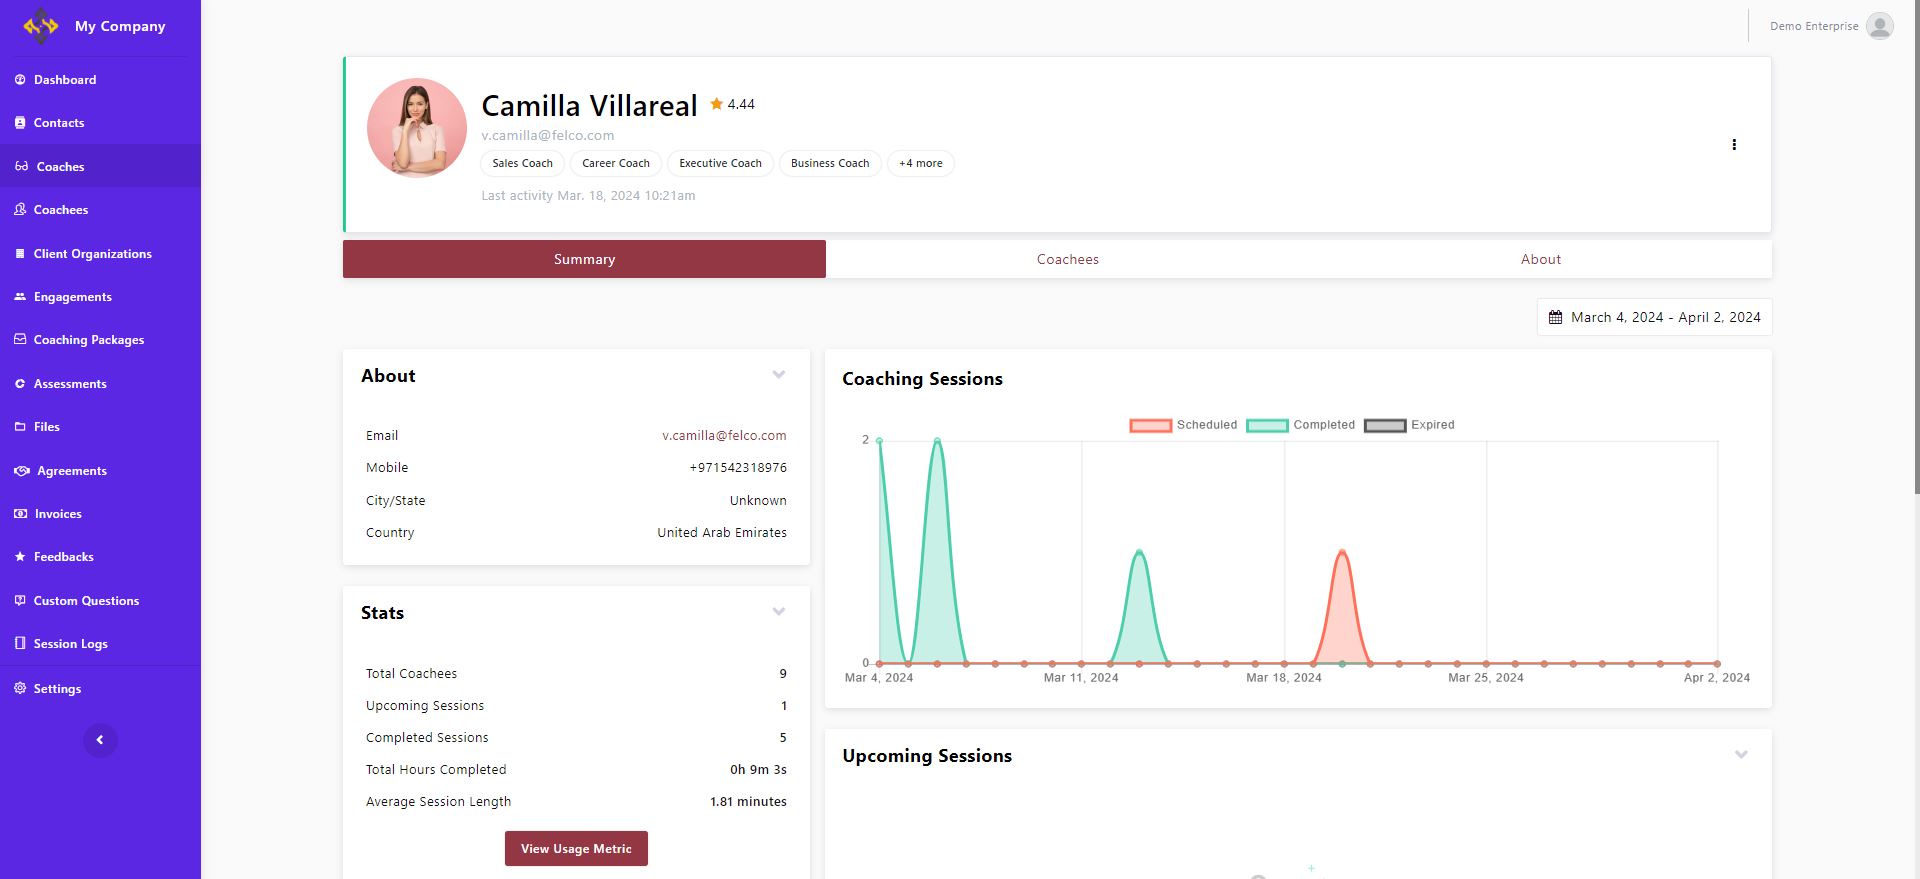
View Coach Profile
When you click on a coach’s name in your Coach List, you will be redirected to their Profile Summary page. This page provides a complete overview of the coach’s activities, performance, and account-related data within your enterprise.
The following sections are available in the Coach Profile Summary:
- About
View the coach’s basic information such as name, email, and profile details. - Coaching Sessions
Displays a list of all past and upcoming sessions for this coach. - Stats
A snapshot of performance metrics, including:- Total logged hours
- Average session length
- Number of completed sessions
- Feedback
Access feedback and ratings submitted by coachees, helping you monitor quality and effectiveness. - Upcoming Sessions
Shows all scheduled future sessions with details such as date, time, and coachee name. - Session Logs
A detailed record of completed sessions, including session status (attended, cancelled, no-show, or late).
 Pro Tip:
You can also access the coach profile by clicking Options next to the coach’s name in the Coaches List and selecting Profile. You will be directed to the same view.
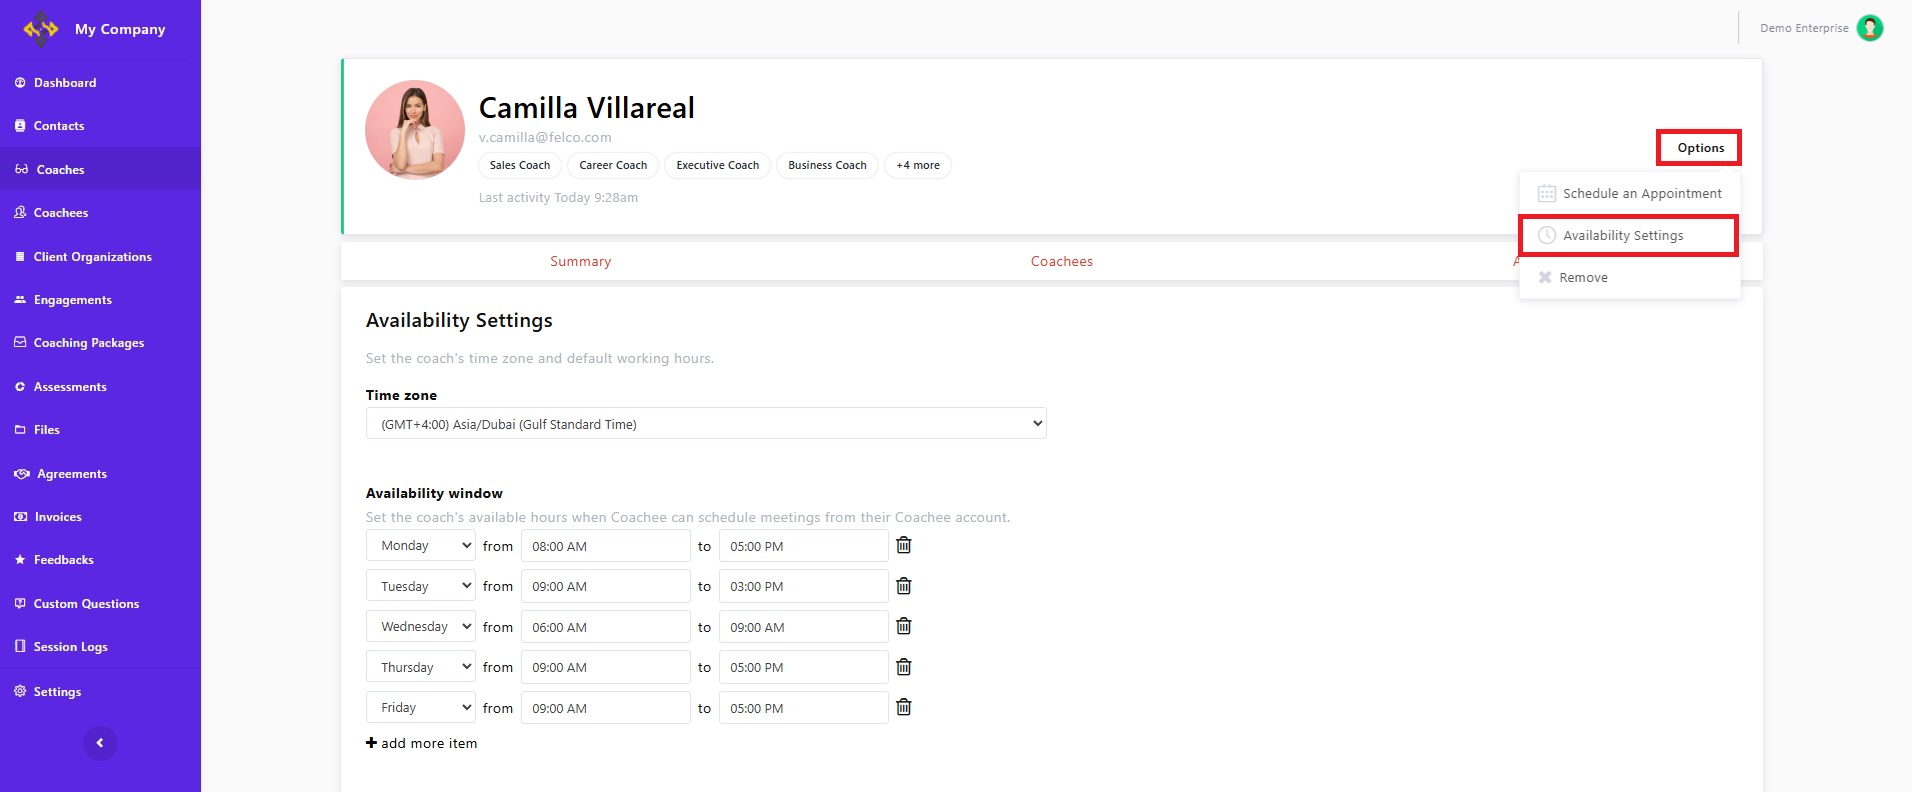
Set Coach Availability
You can optionally manage a coach’s availability directly from the enterprise portal.
To manage a coach’s availability:
- Click the coach’s name.
- Click the Options button at the top right of the screen.
- Select Availability Settings.
- You will be redirected to the Availability Settings page, where you can manage the coach’s timings, timezone, and other settings.
- Click Save Changes once done.
Pro Tip:
Coaches can also set their own availability settings. If you prefer to disable this option, go to Settings → Accessibility and toggle the Disable availability setting option.
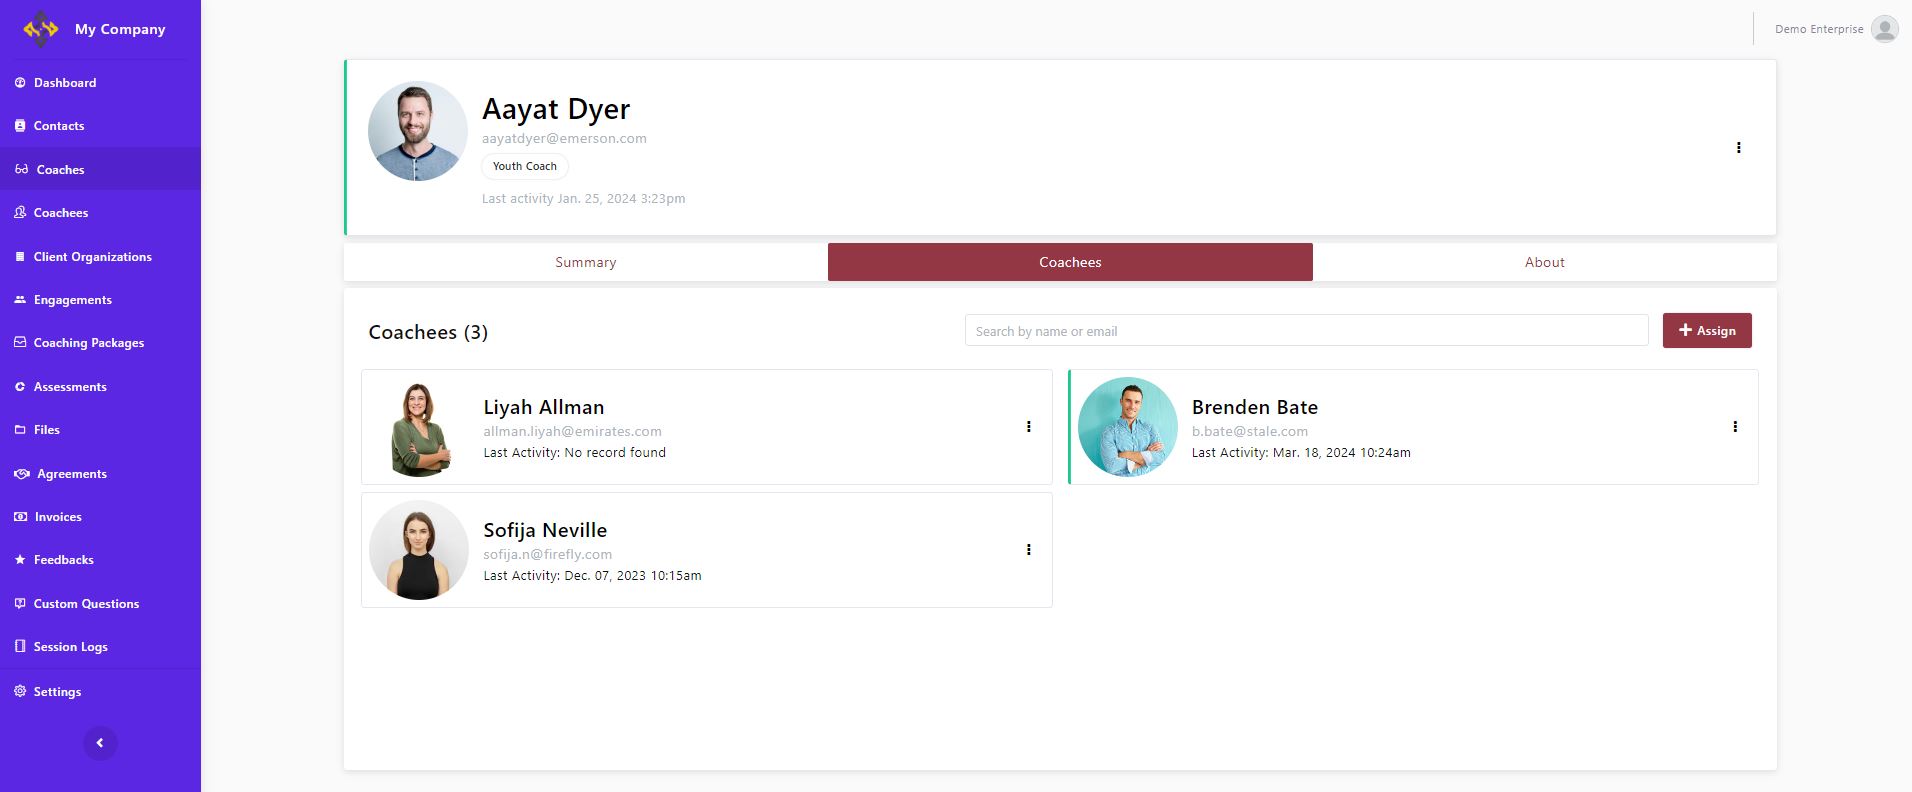
Assign Coachees to Coaches
As an Admin, you can assign individual coachees or entire coachee groups to a coach.
Assign individual coachees:
- In the Coach Profile Summary view, click the Coachees tab.
- Review the list of coachees already assigned to the coach.
- Click the +Assign button.
- Search for the coachee’s name and tick the checkbox.
- You can select multiple coachees if needed.
- Click Assign.
Both the coach and coachee will receive an email notification confirming the new assignment.
Pro Tip:
You can also assign coachees directly from the Coaches List. Click Options next to the coach’s name, select Coachee, and you’ll be directed to the same view to complete the assignment.
Assign a coachee group:
- Go to Coachees in the main menu.
- Click Coachee Group.
- Select the group you want to assign a coach to.
- Click Assign Coaches.
- Click Add Coaches.
- You can add one or multiple coaches.
- Click Next.
- Click Save Changes.
The selected coach(es) will be assigned to all coachees within the chosen group.
Schedule an apppointment between coach and coachee:
- Click the coach’s name.
- Click the Options button at the top right of the screen.
- Select Schedule an Appointment.
- Fill in the form with the appointment details.
- Click Save.
A notification will be sent via the platform and email to both the coach and the coachee informing them about the appointment.
Pro Tips:
- You can invite an authorized user to the meeting by checking the box “Invite authorized user to the appointment.” This option is often used when the Head of Department or an HR representative wants to join during chemistry or discovery sessions before starting a coaching engagement.
- If you want the appointment to be recurring, click the Create Series of Appointments button under the calendar. Then set the total number of appointments in the series and define the frequency
Remove Coaches:
- Click the coach’s name.
- Click the Options button at the top right of the screen.
- Select Remove.
- The coach will be remove from your coaches' list and their seat will be available.
Important Note:
If all of your coach seats are already assigned, you can switch seats by removing one coach and adding another only once per month.