Setting up your Coach Profile

Updated Feb. 24, 2021 by Support

After you created your account and logging in for the first time, you will be redirected to your profile to complete your information.


Complete your profile by entering your personal details as necessary.

Make sure to fill up all the required fields:

  • First name
  • Last name
  • Gender
  • Birthday
  • Current country
  • Mobile Number
  • Choose your coaching type
 

Post profile setup

After filling up and submitting your information, you will be redirected to your profile landing page.

This page is where you can update photos (profile and cover photo) and also where you configure your profile settings.


Set/update profile photo
  1. To set your new profile photo, click on the blank profile photo for the file selection window to appear.
  2. After selecting the file, a photo resizer modal will appear for you to adjust the position and the size of your photo.
  3. Click the Save changes button to save.


Set/update cover photo
  1. To set your new cover photo, hover on the cover photo section and click "Change cover photo" > "Upload a new photo" for the file selection window to appear.
  2. After selecting the file, you can reposition your cover photo vertically to your liking.
  3. Click the save button to finish the process.

Set Coaching Profile Cover Photo


Configure Profile Settings

Coaching Loft helps coaches establish their online presence allowing their coach profile across the web. You can make your profile available and searchable by the public, allowing search engines to scan and index your profile helping you gather more prospects or potential coachees.

  • By default, "Visible to public" is disabled to protect your privacy. You can enable this if you want to make your profile indexed by search engines like Google, Yahoo, Bing, etc.
  • Provide a custom URL for your profile, your custom URL must contain 6-100 letters or numbers, avoid using spaces, symbols, or special characters.
  • Click Save changes to finish the process.

Coaching Profile Settings


Your profile is now up and ready! Your coachees will identify you easily when you complete your profile by doing the procedures above.

If you turn on the "Visible to Public" setting your profile will be scanned by search engines in the next 7 days. You can also click the "Preview" button for you to review what the public will see when they visit your coach profile. 


Membership Level & Pricing Plans

Updated Mar. 01, 2023 by Support
Membership Levels

Coaching Loft offers 4 different Membership Levels for coaches to choose from:

  • Basic
  • Core
  • Premium
  • Master

Our basic account includes 2 coachee slots. Coaches can upgrade their membership level to get more coachee slots later on.

Business/Enterprise Accounts on the other hand include a USD 95.00 per coach seat.

Learn which features are included in each plan and calculate your payments on our pricing page.


How to purchase and upgrade membership level subscription

To upgrade your membership level:

  1. Login to your Coaching Loft Account.
  2. Skip to step 3 if you have your Coaching Loft Account. If you don't have a Coaching Loft Account, you can get started by visiting the pricing page and clicking the "Get Started Now" button on the membership level of your choice.
  3. Click your profile picture found at the topmost right side of your browser, a dropdown menu will pop up, click Subscription, or alternatively go to our pricing page.
  4. Review the features and pricing at the pricing page and choose which membership level you prefer by clicking the "Purchase" button or opt-in for a 14-day trial on any membership level by clicking the "14-day free trial" button if you still haven't claimed your 14-day trial.
  5. Toggle between Monthly and Annual plans and fill up the billing information form then proceed to the next step.
  6. You will be redirected to the Order Summary page where you can review the price you're about to pay, monthly recurring payment details, and also input a promo code if you have one.


  7. You will be redirected to a secure form to complete your payment by entering your credit card credentials and completing the transaction process.
  8. Your Account will be upgraded after a successful transaction, if not you can try doing another transaction or you can contact us in case you need assistance.


 Upgrade your Membership Level


Membership Downgrade/Subscription Cancellation

Updated Mar. 01, 2023 by Support

To cancel your current membership subscription:

  1. Login to your Coaching Loft Account.
  2. Click your profile picture found at the topmost right side of your browser, a dropdown menu will pop up, click Subscription, or alternatively go to our pricing page.
  3. Click the Cancel Subscription button at the bottom of the page.
  4. Downgrade coming from a 14-day trial membership:
    Simply input your password to proceed with the downgrade process. Upon submitting the form, your account will be downgraded and your billing information will automatically be removed from your account and the system.
  5. Downgrade coming from Basic/Core/Premium/Master Membership:
    You will be prompted to answer the Downgrade Request form


    Answer the downgrade request form and submit it to send us a downgrade request ticket. The system will send the downgrade link to your email address.

  6. Click the downgrade link from your email address to complete the downgrade process.


Note: Downgrading may cause you to deactivate some of your coachees if your target membership level doesn't have enough slots to accommodate all of the coachees that are currently in your coachee list. Their records and/or accounts will be inaccessible to your coach account for 6 months.
 

Manage your Account Settings - For Coach and Coachees

Updated Feb. 24, 2021 by Support

The Manage Account section is where you can change your account's password, switch themes, and activate the affiliate program on your account.

To access the "Manage Account" setting:

  1. Login to your account.
  2. Click your small profile image on the uppermost right of your screen. A dropdown will appear, then click Settings.
 
Change your password

Change your account password by entering your old password and providing a new one.

Theme Selection (formerly "Color Schemes")

Theme Selection is available to coaches with Master membership level or if a coach is connected or under the management of a Coaching Loft Enterprise Account. To know how to set up branding (for coaches), see our user guide called Branding / White Labeling - For Coaches.

By default, your personal coach/coachee account theme is set to "Coaching Loft - Default", which contains all of your records, session logs, etc.

Switching to a particular enterprise theme will filter the records of your account and only show records related to the same enterprise account.

Simply click the theme you preferred to change your layout's color scheme and access the data only related to the enterprise account you are connected to.

coaching practice software

If you need access to all of your data, simply switch back the theme to "Coaching Loft - Default".
Switching themes can also be done quickly by clicking the quick switch theme button located at the uppermost right of your screen right after the message icon.

free online coaching platform


Affiliate Program Activation

Both Coach and Coachee Accounts have access to our Affiliate Program. To learn more about the program, visit the Affiliate Program Landing page.


Activate Affiliate Program


Manage your Account Settings - For Enterprise

Updated Jul. 28, 2020 by Support

This guide will help you get your enterprise account in line with your company's branding, understand Authorized User Accounts, configure navigation access, and update your billing and resources based on your needs.

After logging in with your enterprise account, go to Enterprise Settings.


General Settings

This page is where the currently logged in user can change their name and account password, and also where the list of Authorized User Access list can be found.

Authorized Users - are the users that can access your enterprise account, it can be an admin or a colleague working on your company, or a stakeholder from another company that your coaching company is currently coaching. Authorized users have different permission types - Read, Edit, and Full.

Understanding Permission Types:
  1. Read (Read-Only) - Read-only permission is usually given to stakeholders, CEO, HR from another company/organization, that your coaching company is currently coaching or working with. This permission strictly limits the user to read/view records of the coachees that are under their organization for monitoring purposes.
  2. Edit - Can access edit all data/records on the enterprise account, but they won't be able to access administrative settings, like adding a new Authorized User, Manage Billing Information, etc.
  3. Full - Has full access to the account, can access the same as the owner of the enterprise account.
To add an authorized user:
  • Click the "New" button aligned to the Authorized User Access header
  • Fill up the form fields with the user's name, email address and permission type
  • After submitting, an invitation will be automatically sent to the person's email address
  • You can resend the invitation to the person by clicking the "Resend Invitation" button
  • Assign read-only users to their organization.


Company Information & Branding (Logo & Color Scheme)

Update your company's information and branding for users, coaches, and coachees to easily identify your company.

Tips for Color Scheme:
  • As much as possible, avoid using one color value for both Primary and Secondary fields.
  • If possible check some of your account pages to ensure that the color scheme contrast with another.


Navigation Menu

This setting allows you to configure which navigation menu items will be available for Read-only Authorized Users (Stakeholders, CEO, HR, etc.) and Coachee accounts connected to your enterprise account.


Billing

This page is where you can manage coach seats, display your next scheduled billing payment, and also see your payment history on Coaching Loft.

Managing Coach Seats
  • If you add a coach seat during the trial period, your account won't be charged but instead, the total computed amount based on coach seat count will be billed after your trial period expires.
  • If you add a coach seat after the trial period, your account will be charged right after you submit the changes. The immediate charge will be computed based on the number of remaining days of your next billing payment, the new total computed amount based on the coach seat count will be billed on your next scheduled billing payment.
  • Removing 1 coach seat, on the other hand, will deduct $95 on your total monthly billing amount. This procedure is undoable - after you submitted the form, you won't be able to get back the seat that was recently deducted to your account.


Logging Out of your Account

Updated Jul. 07, 2020 by Support

We strongly recommend that when you are done using the platform, you should log out of your account, to further protect your data from being compromised.

Logging out can ensure the security and privacy of you or your company's intellectual property, financial information, and keep the confidentiality of your session logs, action list, goals, etc.

How to logout:

  • Click the small profile picture found at the upper right most of your screen.
  • Click Logout.
 
Auto Logout Mechanism

In any event that you left your browser open for an hour without doing anything, Coaching Loft's security mechanism will automatically logout your account unless the system detects any movement or activity within the same browser tab.


Lost your Password? Reset your Account Password

Updated Jul. 28, 2020 by Support

If you cannot log in to your Coaching Loft Account, you can request a password reset by visiting the following links below.

To request a password reset:

Input your email address for us to send you the password reset link. 

If you didn't receive any password reset link on your inbox, check your spam folder or try sending another request again.


Branding / White Labeling - For Coaches

Updated Feb. 24, 2021 by Support

Change the logo and the colors of the platform based on your branding. This feature allows coaches to customize the look and feel of the layout of the platform to their preference. 

Branding/White Labeling is a feature only accessible to Coach Accounts with Master Membership Level

To start branding your account:

  1. Go to your account settings.
  2. Scroll down to the "White Labeling" section, click the "configure" button.
  3. Upload your company square logo and define the color scheme of the account.

    Set Brand Logo


  4. Hit Save & Apply to immediately use the theme.


Branding/White Labeling feature is only accessible to coach accounts with Master membership level, visit the Membership Levels page.


GO TO MEMBERSHIP LEVELS PAGE


Setting up Email Sending Domain - Enterprise Account

Updated Sep. 27, 2021 by Support

 *Only available for Enterprise Accounts.

Connect an email sending domain to authorize Coaching Loft on sending notification emails to your coach and coachees on your behalf.


What is domain authentication?

Domain authentication shows email providers that Coaching Loft has your permission to send emails on your behalf. To give Coaching Loft permission, you point DNS entries from your DNS provider (like GoDaddy, Rackspace, or Cloudflare) to Coaching Loft. This will ensure deliverability and prevent notification emails to be marked as spam when sent using your company's email address.

Email service providers distrust messages that don't have domain authentication set up because they can not be sure that the message comes from you.


Setting up domain authentication

Before you begin

To set up domain authentication, you must submit the DNS records provided by Coaching Loft to your DNS or hosting provider (for example, GoDaddy, Hover, CloudFlare, etc.). First, figure out who your hosting provider is and if you have access. If you don't have access to your DNS or hosting provider, you should figure out who in your company has this access before you begin setting up domain authentication.

To set up domain authentication:

  1. In the Coaching Loft - Enterprise Settings page, select Email Sending Domain.
  2. In the Email Sending Domain section, click Authenticate your Domain.
  3. Fill in the domain that you want to send from. Make sure that you only enter the name of your root domain. Do not include www or http://www in this field. Your domain needs to match the domain of your FROM address on the emails you are sending out. For example, if I am sending an email from [email protected], I would set my domain authentication domain to be coachingloft.com. Click Next.
  4. Next, you need to add all of the CNAME records on this screen to your DNS host. This process varies depending on your DNS host. If you don't have access to modify your company DNS records, you can also email a request to a co-worker. This email includes a direct link to the CNAME records. This link does expire. The recipient doesn't need login access to your Coaching Loft account.

It can take up to 48 hours for the records to verify after you upload them into your DNS host, so you will likely have to come back later to verify.


Verifying your DNS

Once you add the CNAME records to your DNS host, return to the Email Sending Domain page and click Verify.

If you click verify, and only half of your CNAME records verify, this usually means that you need to wait a bit longer. It's also possible that you entered one of your records incorrectly.


Any time that you send an email with a FROM address whose domain matches the domain set in the domain authentication, Coaching Loft applies that domain to your email. You only need to update your domain authentication if you want to update the domain you are emailing from.


This functionality is currently only available for Enterprise Accounts.


Secure your account by enabling Two-factor Authentication

Updated Oct. 13, 2021 by Support

Typically, logging into Coaching Loft requires just your username and password. With two-factor authentication (2FA) enabled, logging in requires verification using a second device, such as your mobile phone. Because logging in with 2FA requires that you have access to a physical device, the risk of a potential intruder gaining access to your account is much lower. 

Once enabled, you'll be required to provide a security code when you log in to Coaching Loft. Google Authenticator is recommended to be installed on your mobile device.

Setting up two-factor authentication

To set up two-factor authentication:

  1. For Coach and Coachee:
    - In your account, click your profile picture found at the topmost right side of your browser, a dropdown menu will pop up, click Settings. 
    - Scroll down to Two-factor Authentication section, click Configure.
  2. For Enterprise Acccounts: 
    - From the main menu, navigate to Settings.
    - On the settings sub-menu click Two-factor Authentication
  3. On the Two-factor Authentication page, you can find the links to download Google Authenticator to your mobile device. Make sure to install Google Authenticator before proceeding to step 4.
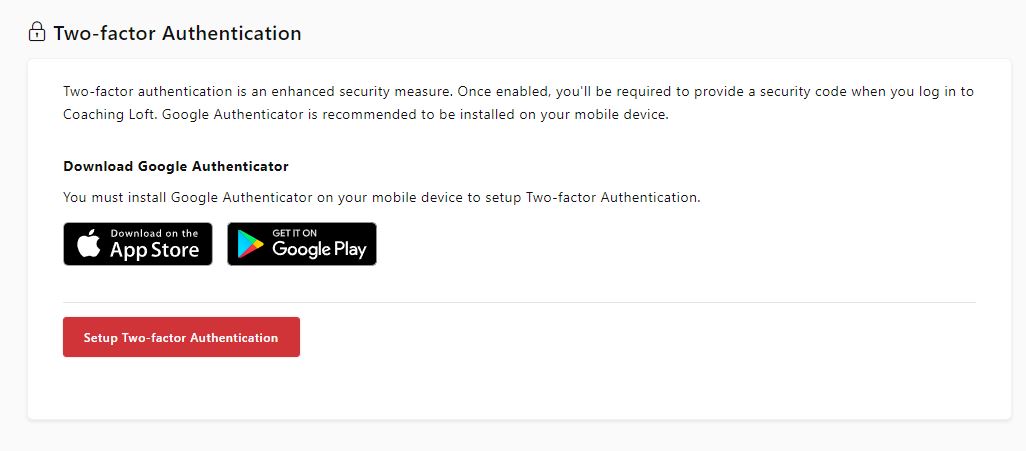
  4. Click Setup Two-factor Authenticator
  5. Scan the QR code using Google Authenticator from your mobile device.
  6. Once Coaching Loft is registered, you'll start seeing 6-digit verification codes in the Google Authenticator App.
  7. Click Next and provide the 6-digit code from the app.
  8. Once 2FA is setup, you will see your backup code, this code can be used in case you lose your 2FA device. Save the code in a safe and secure place somewhere you can easily access when you need it.
  9. Once all the steps above are done, you'll be prompted to enter a code that is delivered to your device the next time you log in.


Using Backup code

If you lose the device you use for two-factor authentication (2FA), or are unable to access your 2FA method, you can use the backup code to regain access to your account. 

From the 2FA prompt screen after you provide your email and password, click "Use Backup code".


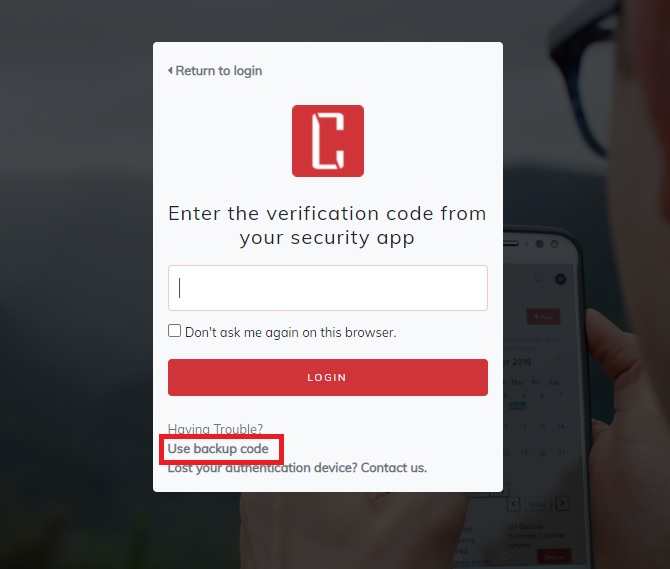
You will be taken to the other text field where you provide you backup code to reset 2FA. Once the code is validated, the system will remove the current 2FA setup on your account, you will have to setup 2FA again using a new mobile device.

What if I don't have the backup code?

You can contact Coaching Loft Support Team by using the Customer Support Chat or writing us an email thru Contact us page.


Customizing your email messages

Updated Nov. 08, 2021 by Support

This feature allows coaches and enterprise account owners to compose/customize their own email message templates to their own preferences. 

Updating your Templates:

  1. For coaches: Go to your Account Settings.
  2. For enterprise: Navigate to Settings, then click Customize Email Message.
  3. Select a template you wish to update, the subject and email content will appear after selecting a template.
  4. Update the Subject and Email content body.
  5. Use Dynamic Tags as it is.
  6. Save your template.

After saving your template, the platform will automatically use your customized email templates for the email alerts/notifications. You can reset this to default anytime by clicking the "Reset to Default" button.


Dynamic Tags

Dynamic tags are a piece of code that will dynamically enter the relevant data or link into the emails that are actually sent. You can utilize it to make your email composition more personal/specific to the recepient of the email notification.
Each template has its own set of Dynamic tags, which is conveniently placed on the right-hand side of the template form.


This feature is only accessible to enterprise accounts and coach accounts with Master membership level visit the Membership Levels page.


GO TO MEMBERSHIP LEVELS PAGE


Custom Login Page Setup - Enterprise Account

Updated Oct. 10, 2022 by Support

 *Only available for Enterprise Accounts.

The Custom Login page is a straight forward solution for you to use your own website domain name and branding on the login page. The same login page can be easily integrated to your website by just copy-pasting the Login page link on your website's main menu header/navigation.


Step 1: Setting up DNS records

To get started, you must submit the DNS records provided by Coaching Loft to your DNS or hosting provider (for example: GoDaddy, Hover, CloudFlare, etc.). First, figure out who your hosting provider is and if you have access. If you don't have access to your DNS or hosting provider, you should figure out who in your company has this access before you begin setting up domain authentication.

To set up domain authentication:

  1. In the Coaching Loft - Enterprise Settings page, select Customize Login Page.
  2. Click Setup your Domain button.
  3. Fill in the domain the fields on the page. Provide a subdomain of your choice and your domain name, make sure that you only enter the name of your root domain. Do not include www or http://www in this field. Click Next.
  4. Next, you need to add the TXT and CNAME records to your DNS host. This process varies depending on your DNS host. If you don't have access to modify your company DNS records, you can also email a request to a co-worker. This email includes a direct link to the CNAME records. This link does expire. The recipient doesn't need login access to your Coaching Loft account.

It can take up to 48 hours for the records to verify after you upload them into your DNS host, so you will likely have to come back later to verify.


Step 2: Verify the DNS records

Once you add the TXT and CNAME records to your DNS host, you can click the Verify button to check if the records are installed properly.

If you click verify, and only half of your DNS records returned valid, this usually means that you need to wait a bit longer. It's also possible that you entered one of your records incorrectly.


Step 3: Setup the Login Page

Once the DNS records are verified you will be able to setup the login page.

To setup the login page:

  1. In Settings > Customize Login Page, click the Setup Login Page button.
  2. Add your company logo (Square Logo recommended size - 250x250).
  3. Add a page background (Recommended file type: JPG, 1920x1080 resolution, size not larger than 2.5MB).
  4. Click Save, then go back to Settings > Customize Login Page.

From the 'Customize Login Page', you will be able to see the link to your customized login page, click the Copy button to copy the link and then paste the link on your browser to test it out.


This functionality is currently only available for Enterprise Accounts.


Loading resources, please wait...

Loader